EasyKOT pe apna restaurant set up karo — pehla din, poora.
Every screen a brand-new owner sees on day one, in the order they actually appear — from the signup form to the report that proves the first sale really happened. Nothing here is staged: it's one real store, Spice Route Kitchen, walked through start to finish with a screenshot of every screen.
No signup yet? Try the register in the live demo first — no account, no install.
Three things, and one of them is optional.
- Internet, once. Signup, loading the menu and minting the register's setup code all need a connection. Once the till is connected, billing, KOTs and settling all run with the wifi off.
- A Windows or Mac laptop for the till — or skip the laptop entirely. One Android phone and a thermal printer can be the whole register.
- About fifteen minutes, if you use the sample menu to get a first bill printed today. Importing your own dishes is the long pole — see menu setup & AI import when you're ready for that pass.
Signup se pehli sale tak — seven steps, har screen dikhi hui.
Create your store
Open the signup form and fill in your name, restaurant name, email and password — an invite code is optional, and the page says plainly “Free for your first 3 months.” Press Create store and the dashboard answers with “Your store is ready” and a one-time owner PIN for register sign-in. Save it now: the screen says it is shown only once here, and you can change it later under Staff. Press Continue to dashboard and you land on the checklist.
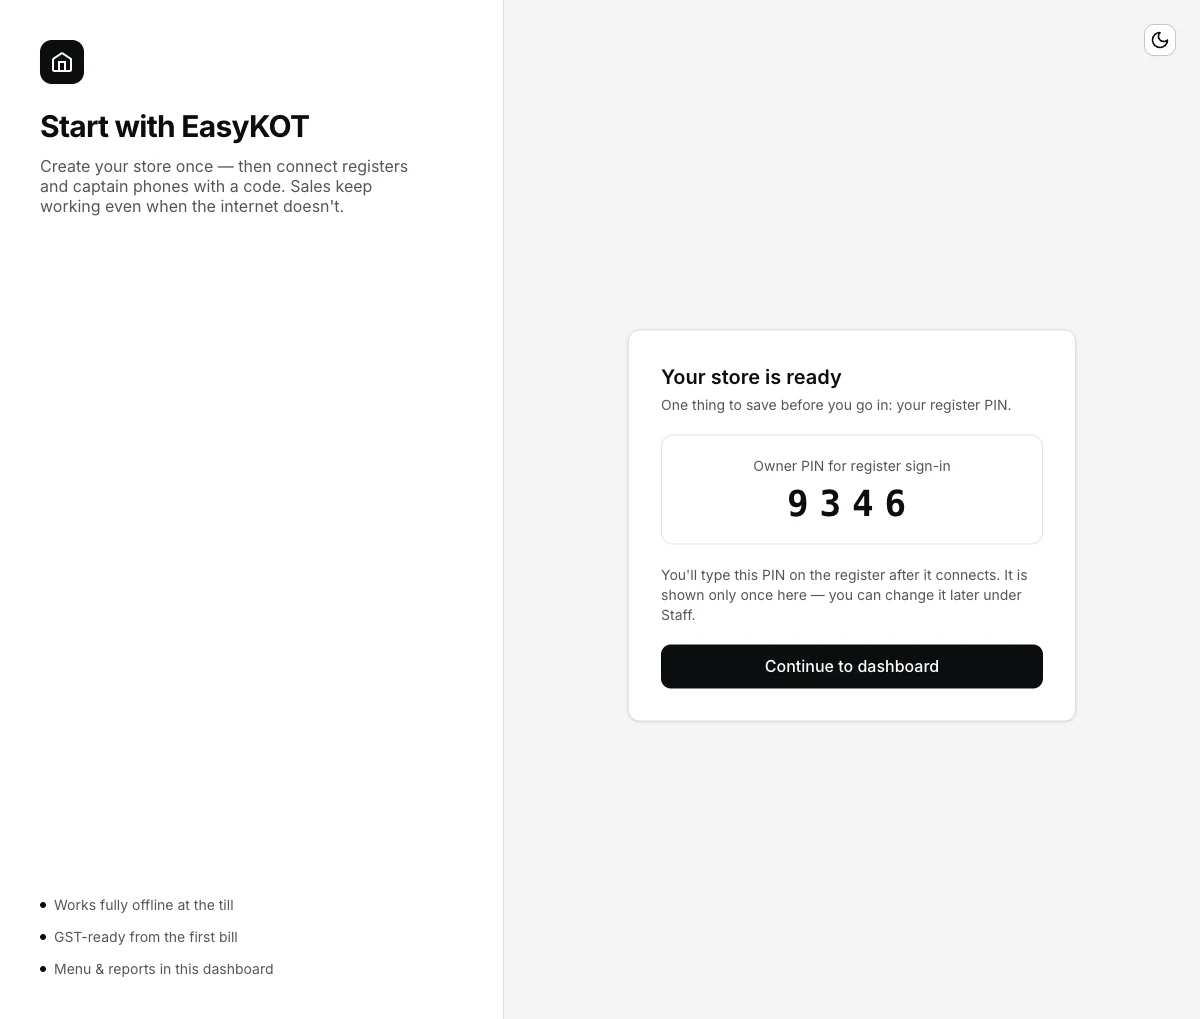
The one-time owner PIN — save it, because it's shown only here.
Open your checklist, and start with the sample menu
The dashboard opens on “3 steps to your first bill”: Add your menu, Connect your register, Ring your first sale. A second group underneath, “When you're ready,” holds Download the register, Connect a captain phone and Add your staff — none of those three block the first three, and exactly one step is open at a time, the earliest unfinished one. The open card offers three doors: Start with a sample menu, Import your menu — CSV, Excel, PDF, or photos, and Add dishes myself. We tapped the sample menu. It is a real, removable Indian-restaurant menu — Starters, Soup, Shawarma, Tandoor, Chinese, Main Course, Roti & Naan, Beverages and more — and it loaded 212 dishes in a few seconds; the checklist ticked itself and now shows “212 dishes ready.”
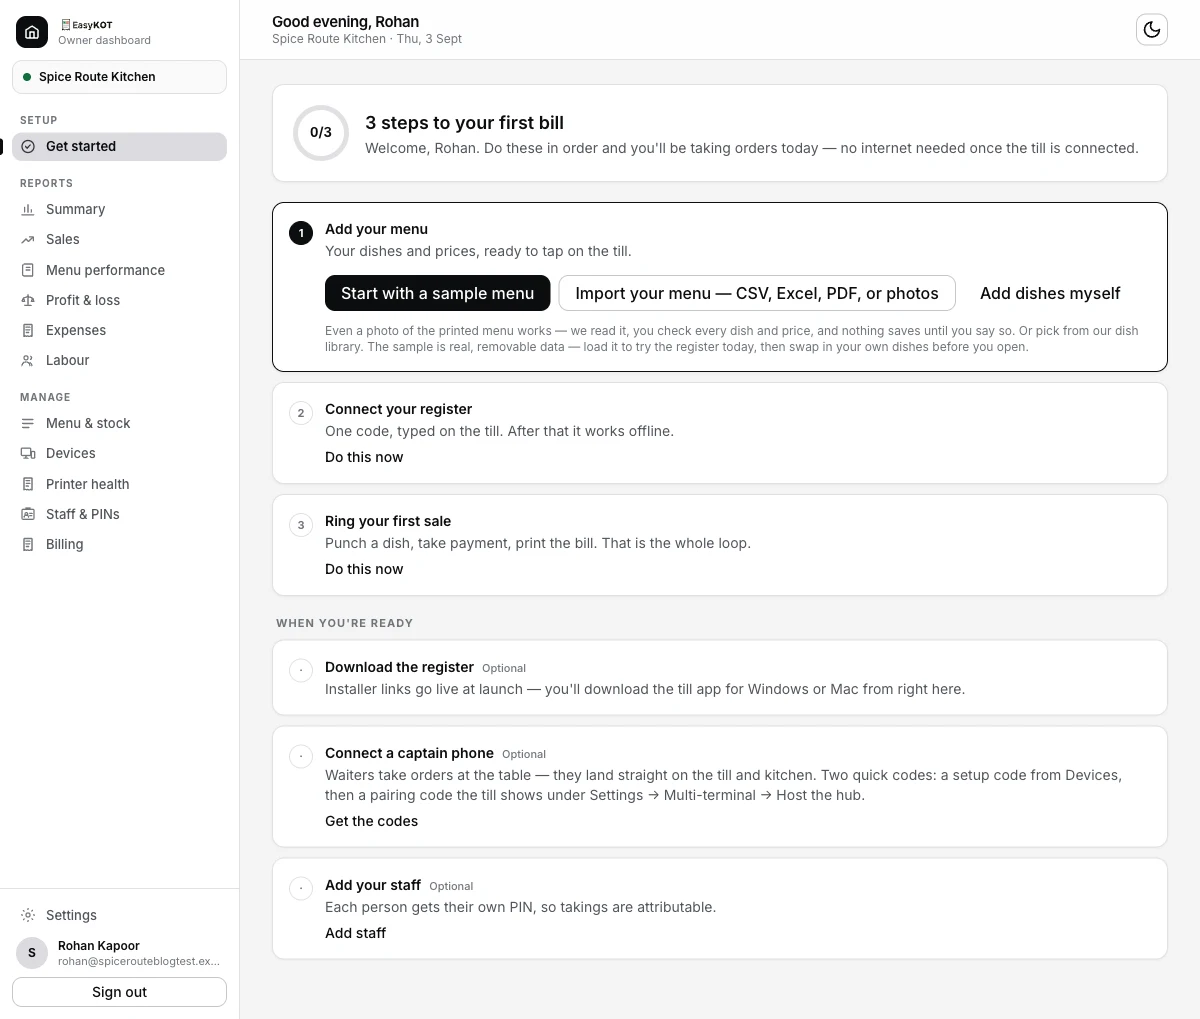
The dashboard opens on this checklist — Add your menu is open first.
Connect your register
The second card is Connect your register. Name the till — Counter 1 is the placeholder — and press Create setup code. The dashboard mints a one-time code starting EPOS1. with a Copy code button, and says exactly where it goes: “On the register, choose I have a setup code and paste this in.” Underneath, the screen settles into “Waiting for the register to connect…” On the till itself, the first screen is Connect this register, with two tabs — I have a setup code and Owner sign-in. Paste the EPOS1. code into the Setup code field and press Connect register. (There's also a “Set up later — use the register without sync” link on that screen — an unactivated till still sells, it just doesn't sync until you come back and connect it.) The code works once and expires; if you lose it, Create a new code replaces it.
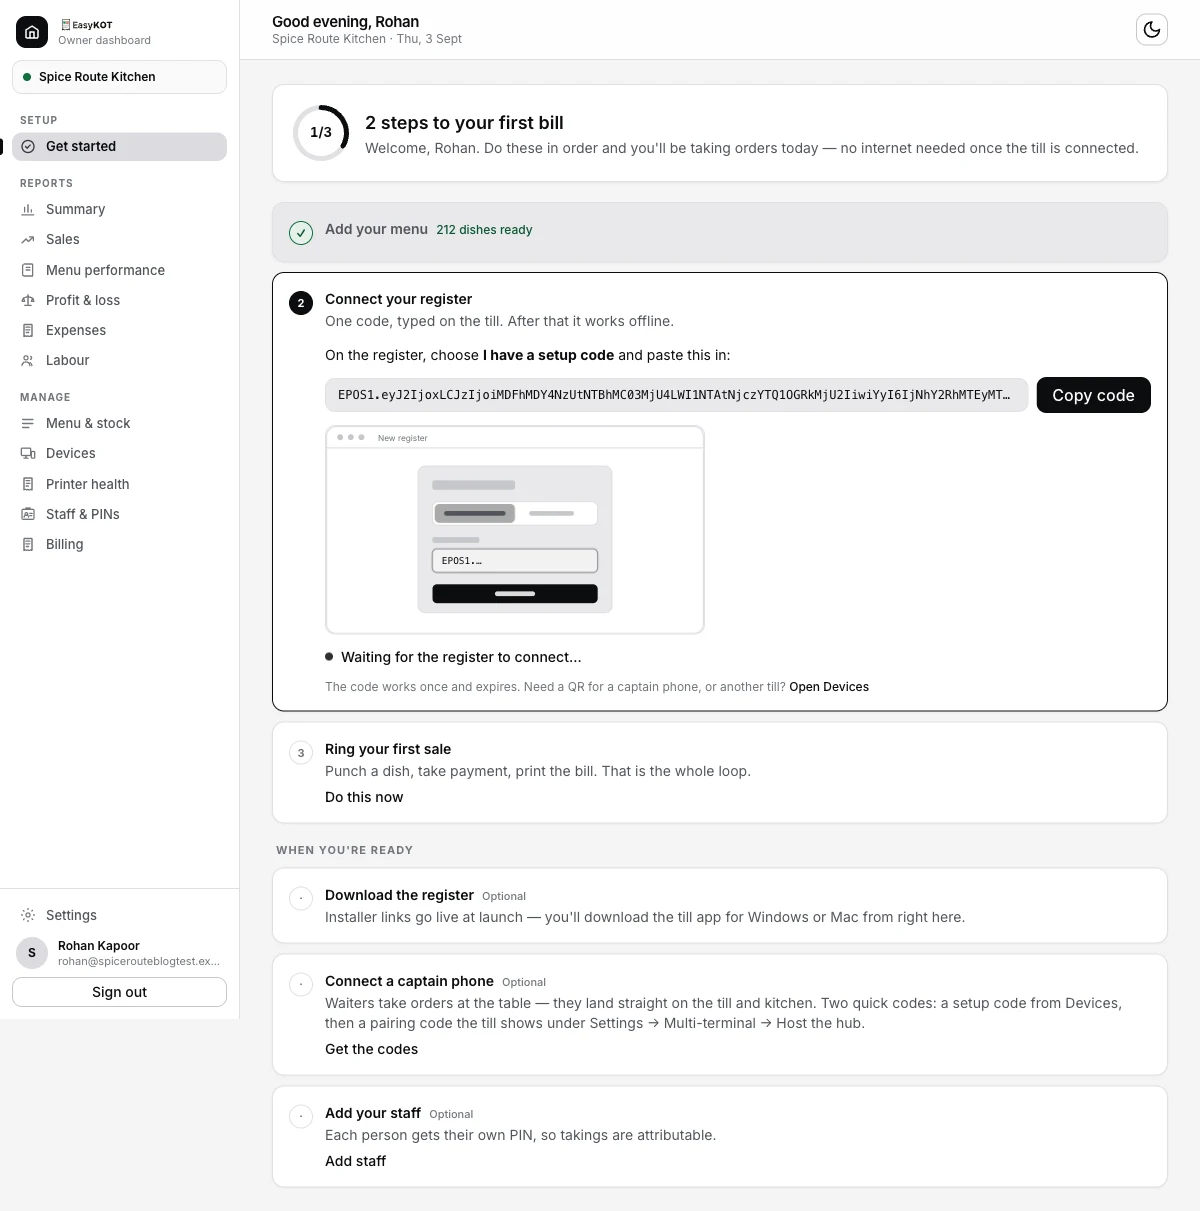
The menu step ticks itself — “212 dishes ready” — and the register step mints a one-time EPOS1. code.
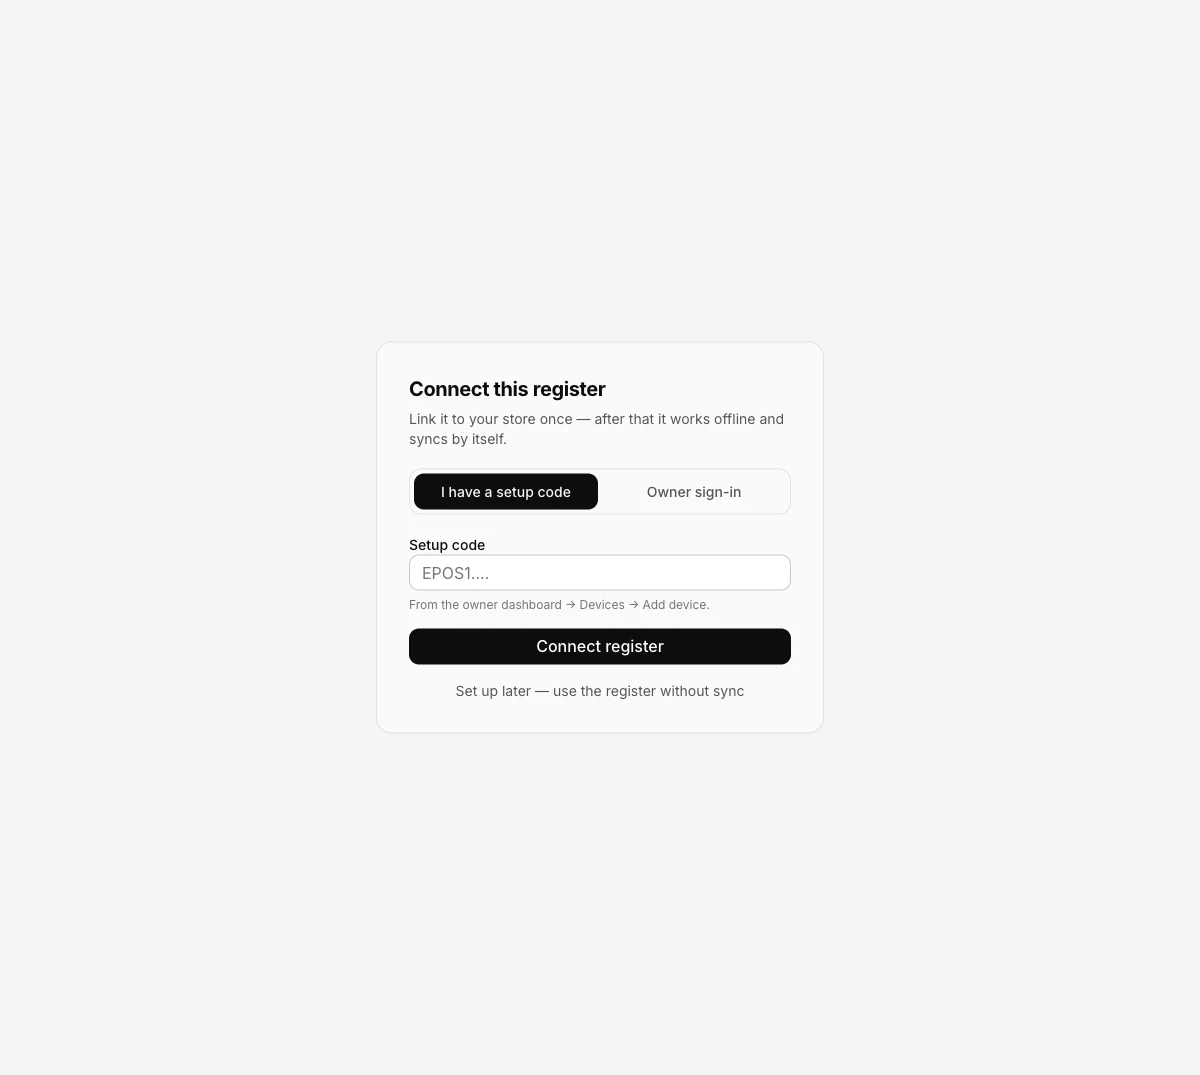
On the till itself — paste the code here.
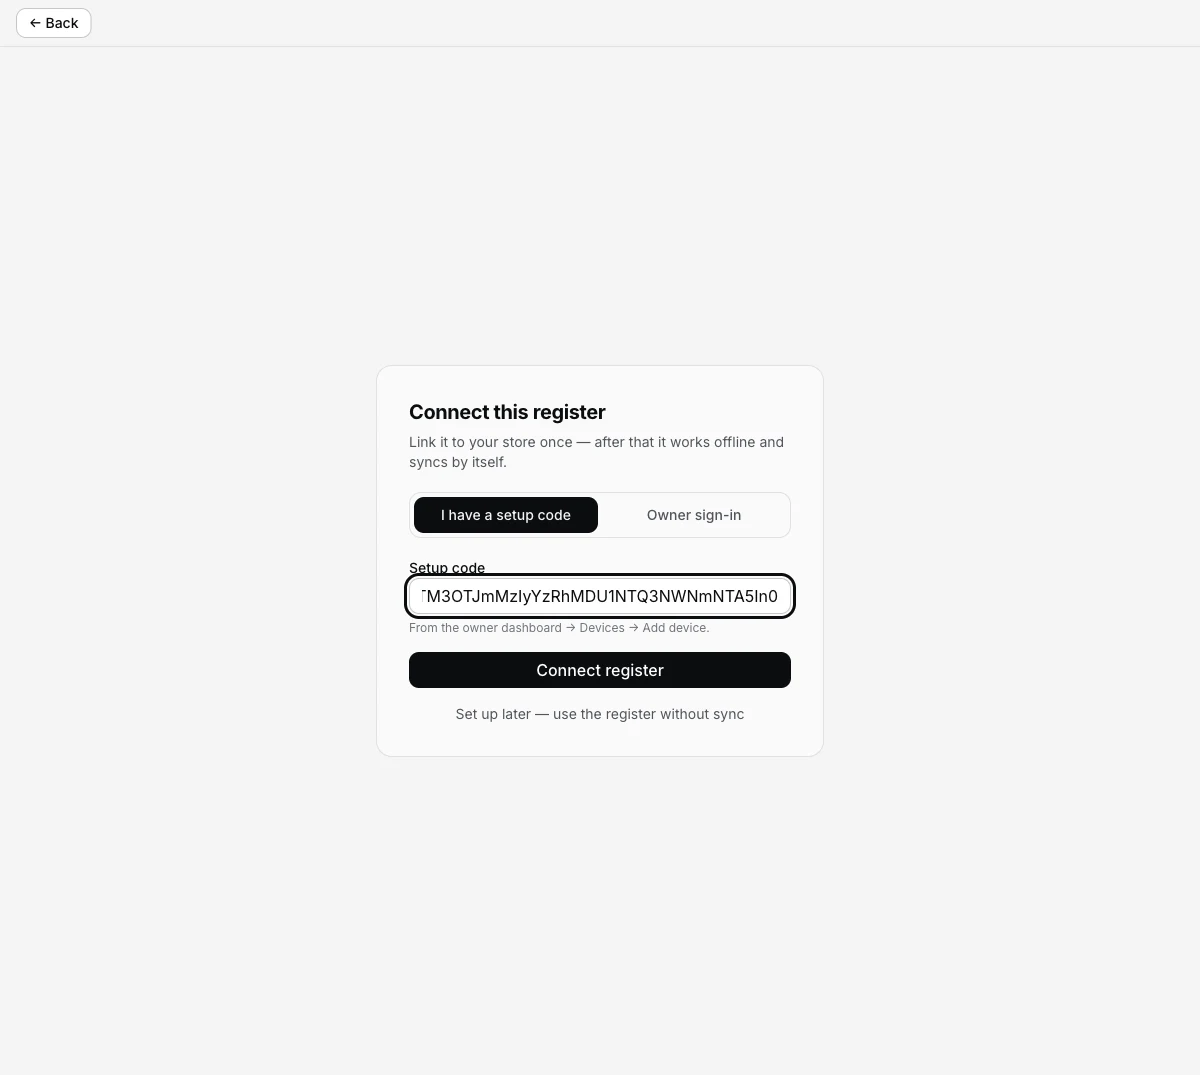
Code pasted. One tap on Connect register and the till is linked.
Watch the catalog sync
The instant the till redeems the code, the dashboard's waiting card ticks itself — no refresh, no second click on either screen. On the register, the empty catalog fills in: all 212 dishes appear under a category rail — Starters 32, Soup 15, Shawarma 17, Tandoor 29 and on down the list — and the status line at the bottom left reads Online · all synced. The staff chip beside it reads Register · owner for a moment — the staff list is still syncing down, so the till is running on a placeholder identity. As soon as it lands the register asks for a PIN: type the four digits from step 1 and the chip changes to your name (Rohan Kapoor · owner here). Every restart from now on starts at that PIN pad. A “Set up your printer” nudge sits in the empty order panel — that's optional for today; connect a thermal printer covers it end to end.
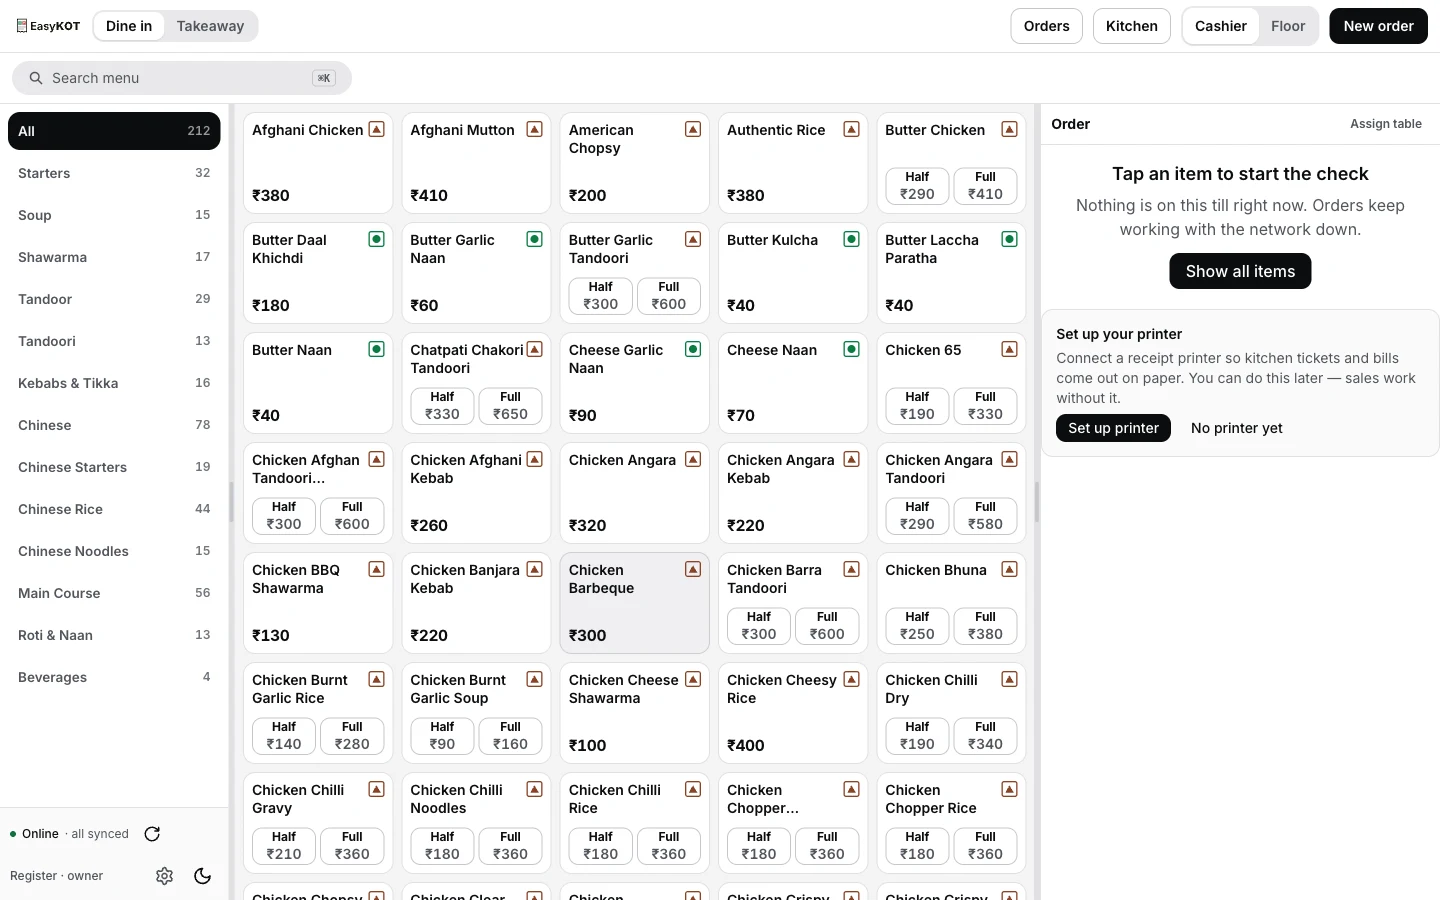
The moment it syncs — all 212 dishes, and the status rail reads Online · all synced.
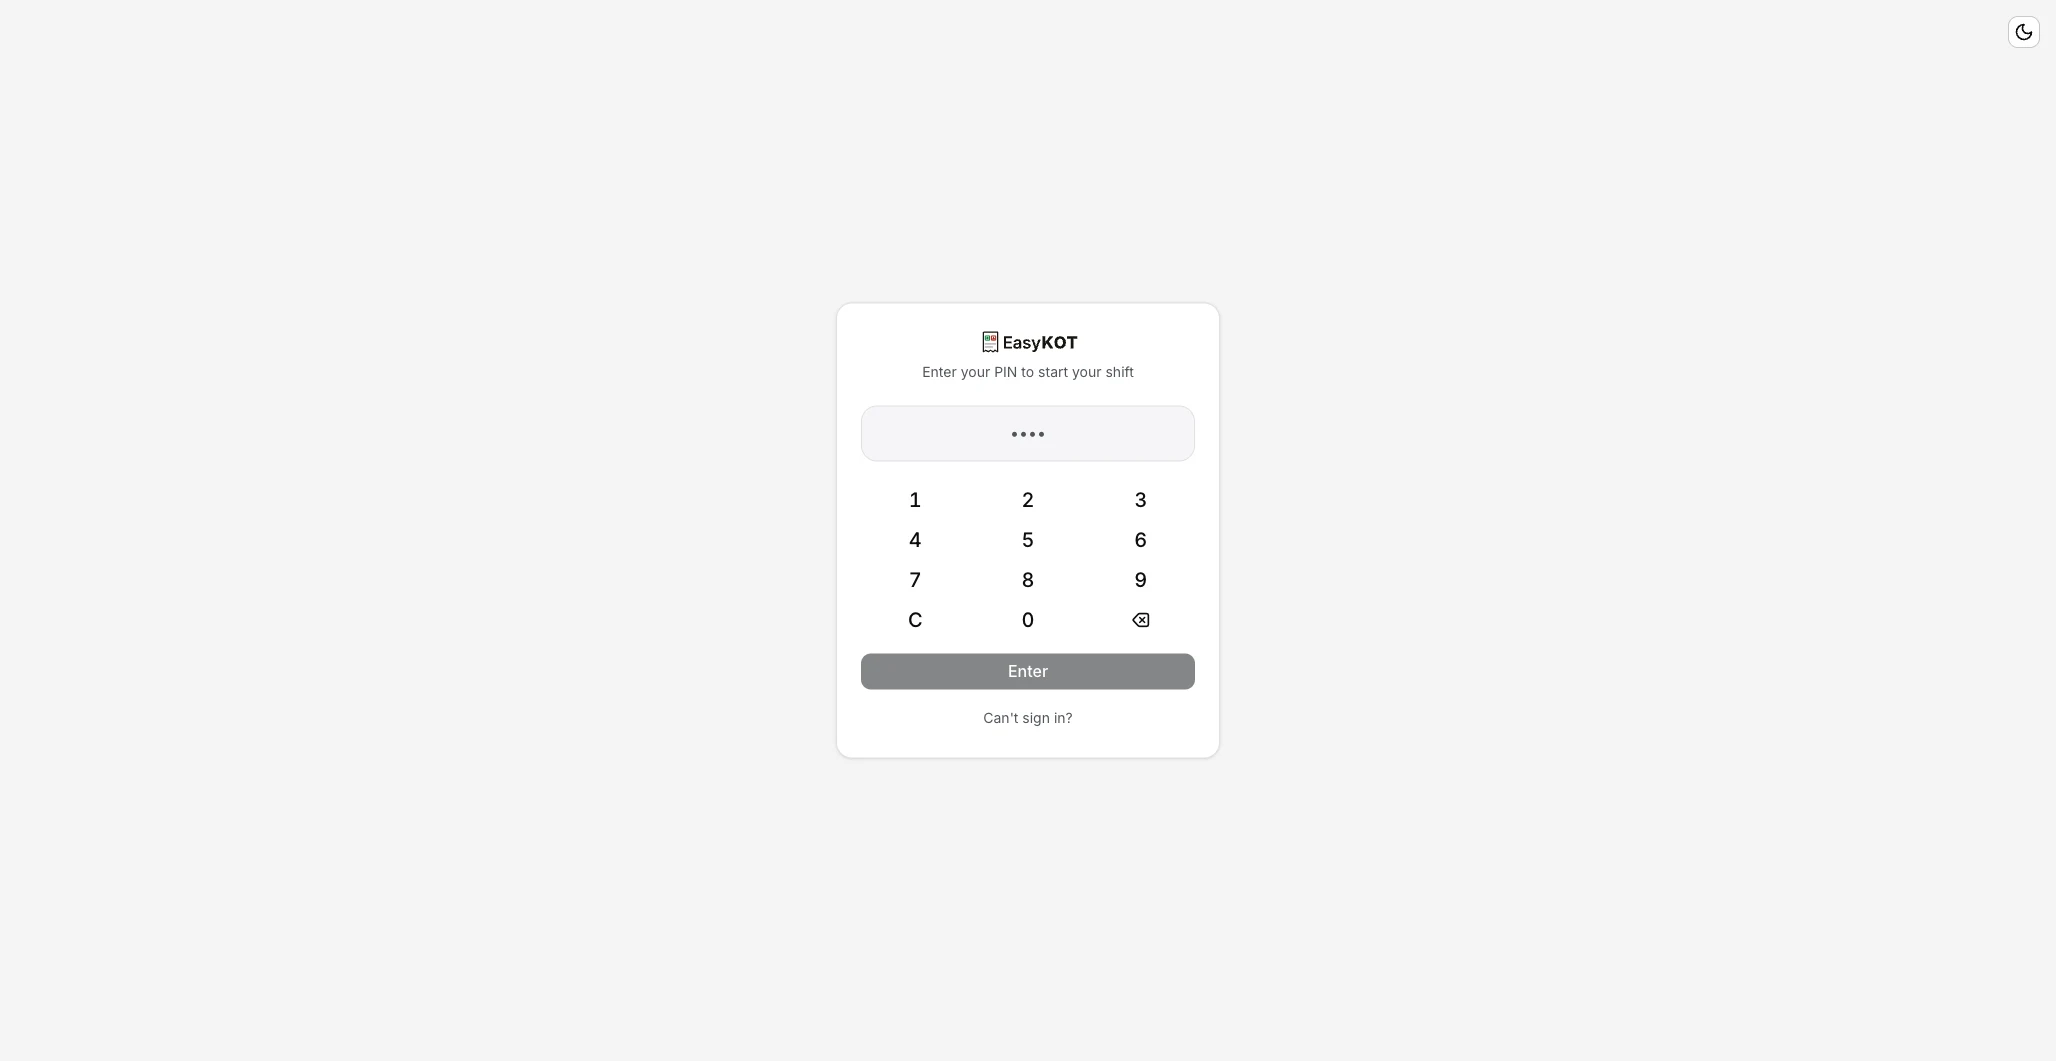
Once the staff list has synced, the till asks for the PIN from step 1 — and starts here on every restart.
Punch the order
Tap Dine in or Takeaway at the top — Dine in is the default — then tap a dish to start the check. Butter Chicken has portions, so a sheet opens: Half ₹290, Full ₹410. Pick one and press Add to order. Tap a second dish, plain-priced this time, and it lands as its own line with no sheet at all. Tap the same dish a second time anywhere in this flow and the quantity on that existing line goes up — it does not start a second line. The cart on the right keeps a running Subtotal, GST and Total as you go; two dishes here came to a Subtotal of ₹480, GST of ₹24, and a Total of ₹504.
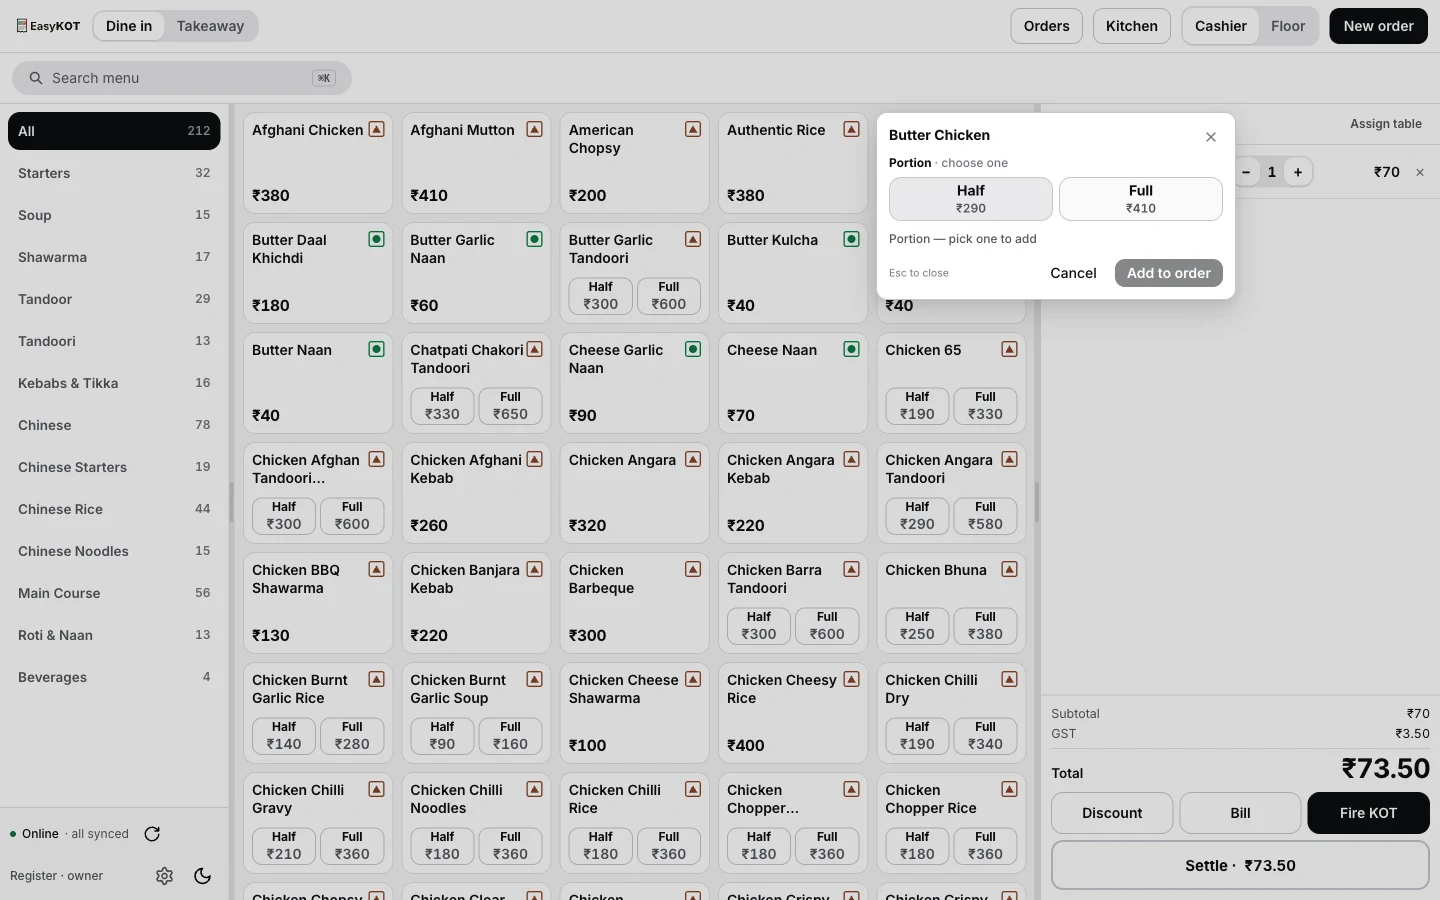
Tap a portioned dish and a sheet asks Half or Full before it lands in the cart.
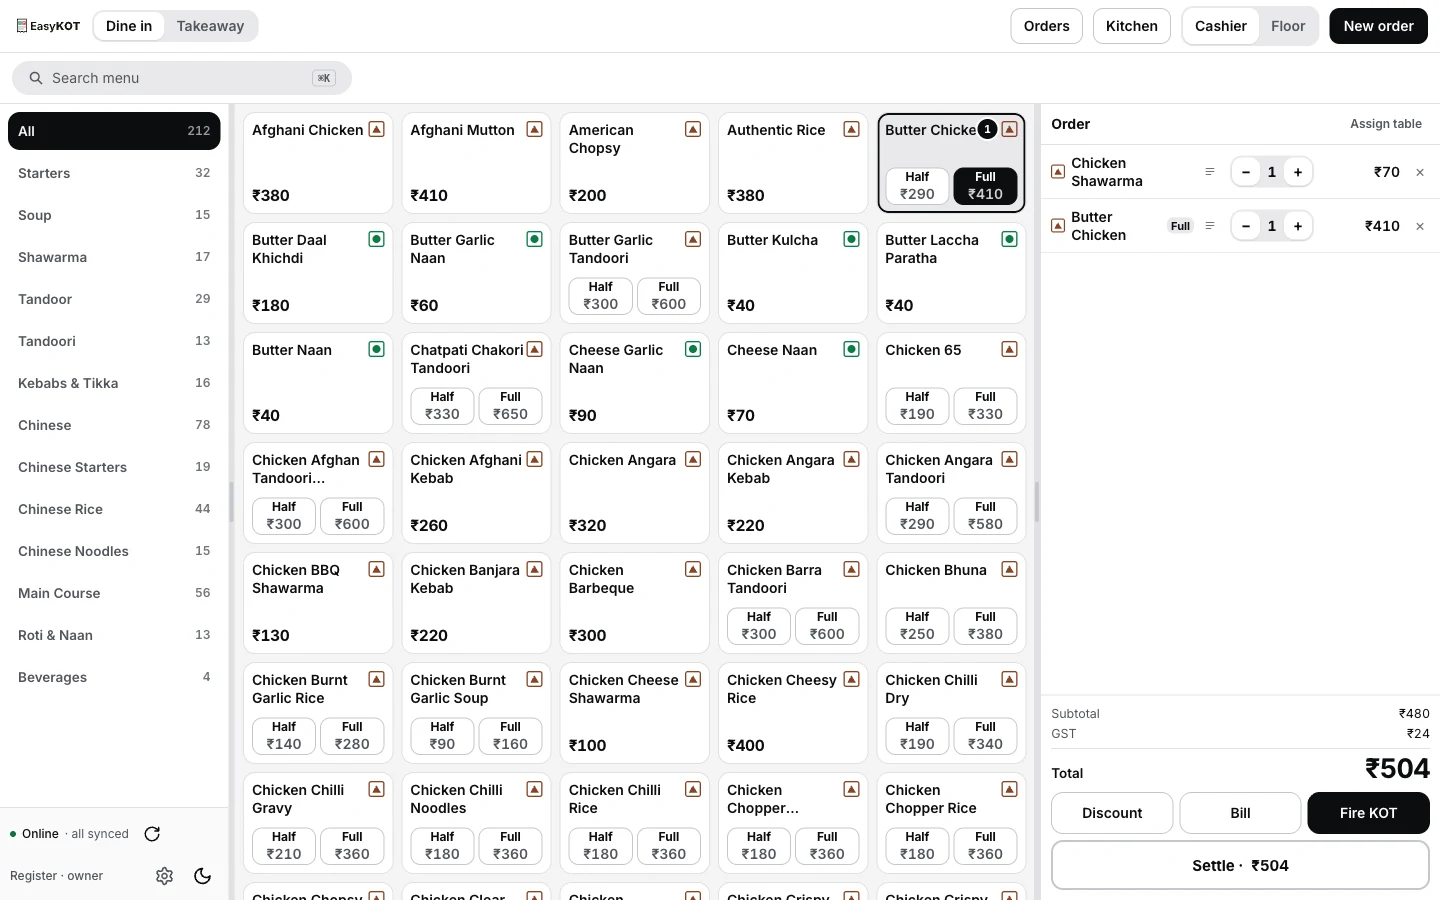
Two dishes in — Subtotal, GST and Total update as you tap.
Fire the KOT, then settle
Press Fire KOT. Both lines lock in — each one now says Sent 23:43 — and the key itself changes to read KOT fired ✓. The Kitchen button in the header picks up a badge for the open ticket, and on the kitchen's own screen the same order appears as KOT 001, DINE IN, with a running timer and a Bump button the cook presses when it's plated. Press Settle next. The sheet opens with Amount due ₹504 and Amount received already prefilled to the exact balance — type over it only if the guest handed over something different. Pick a tender: UPI, Cash, Card or Part pay. We picked Cash and pressed Settle ₹504 · print bill. The receipt preview opens straight after: the store name, DINE IN, the invoice number and its date, both item lines, CGST and SGST split evenly, the total, and Paid (cash). Press Done, or Print / Reprint if a printer is connected.
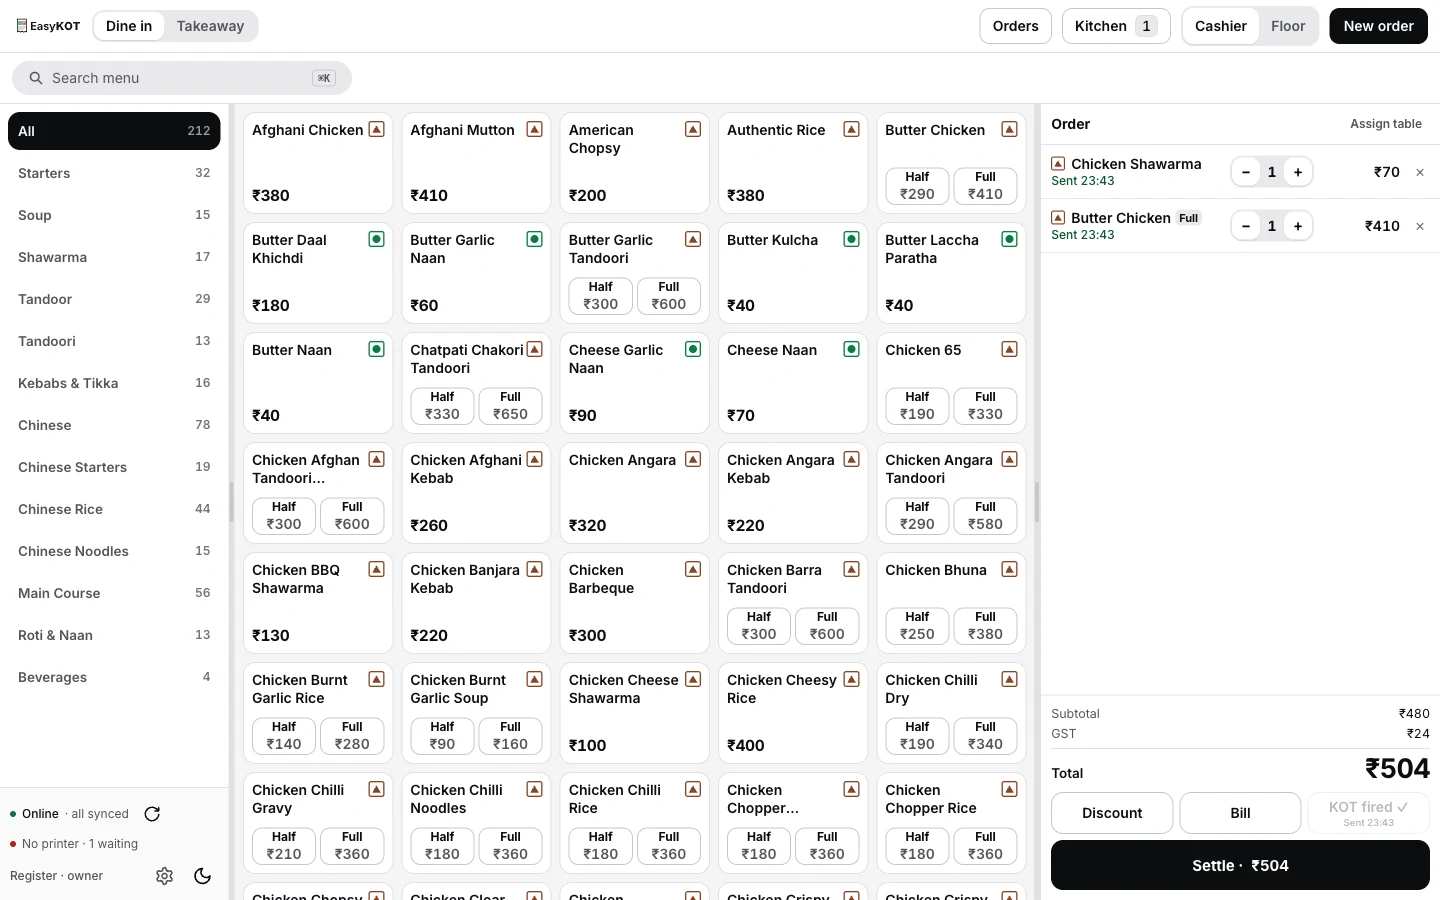
Fire KOT sends the ticket to the kitchen — the key locks to “KOT fired ✓.”
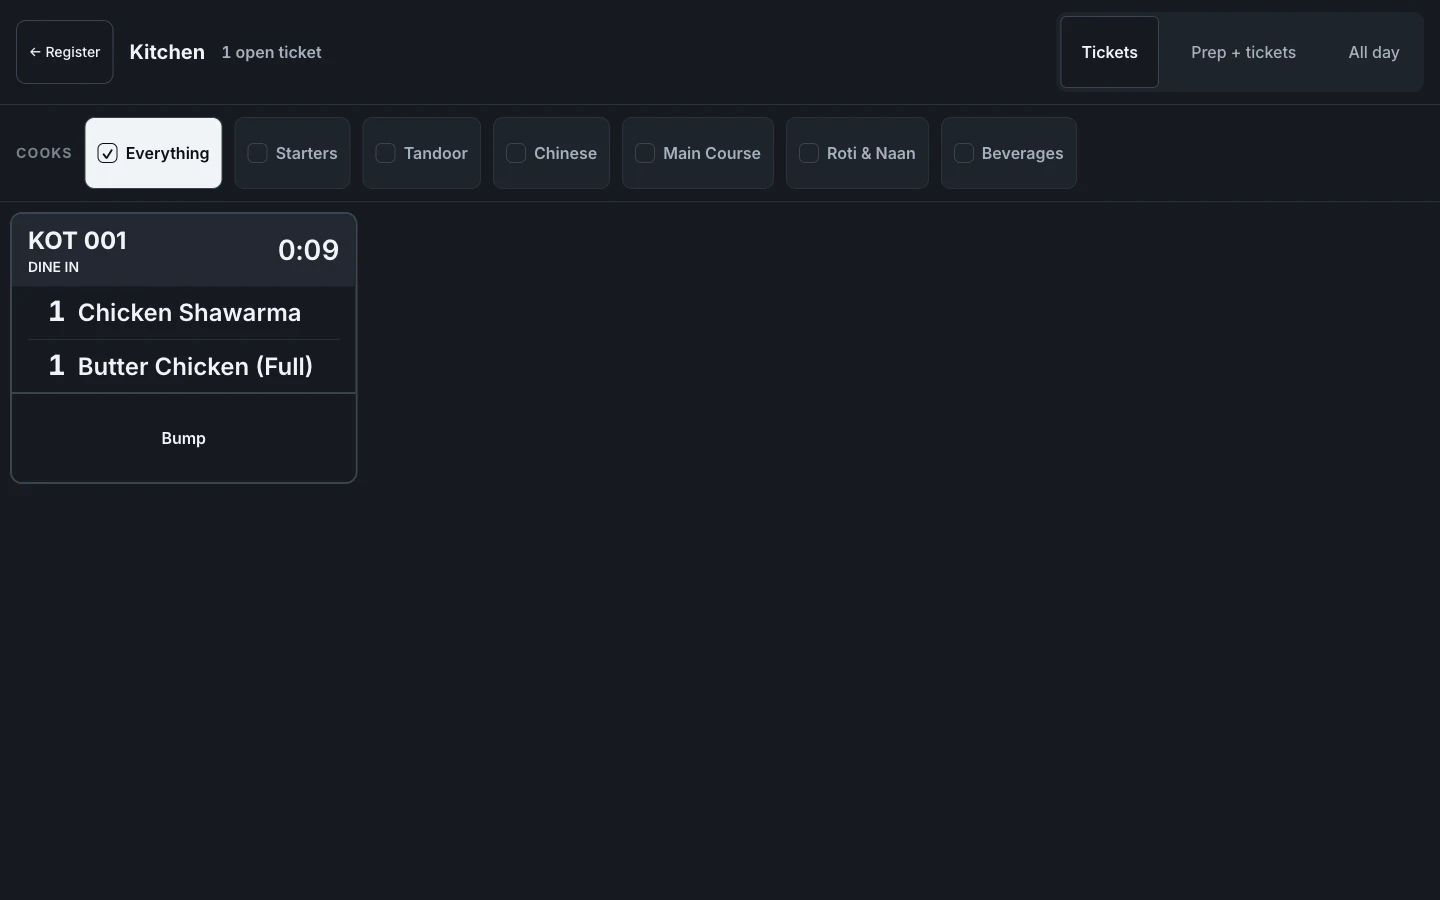
The kitchen's own screen — same order, cook-facing, with a Bump button.
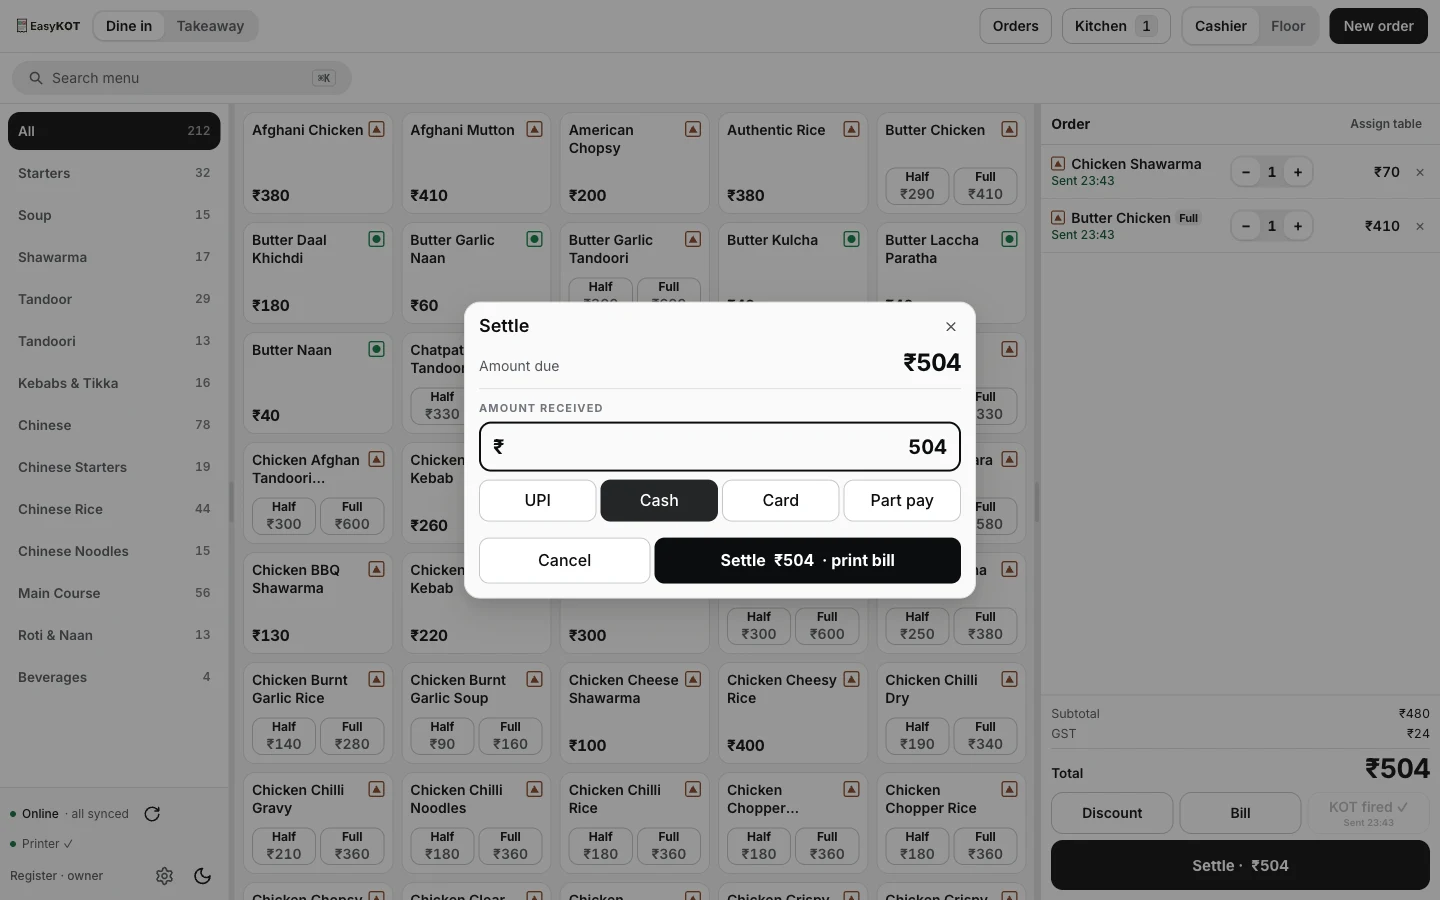
Settle prefills the balance — pick a tender and press Settle · print bill.
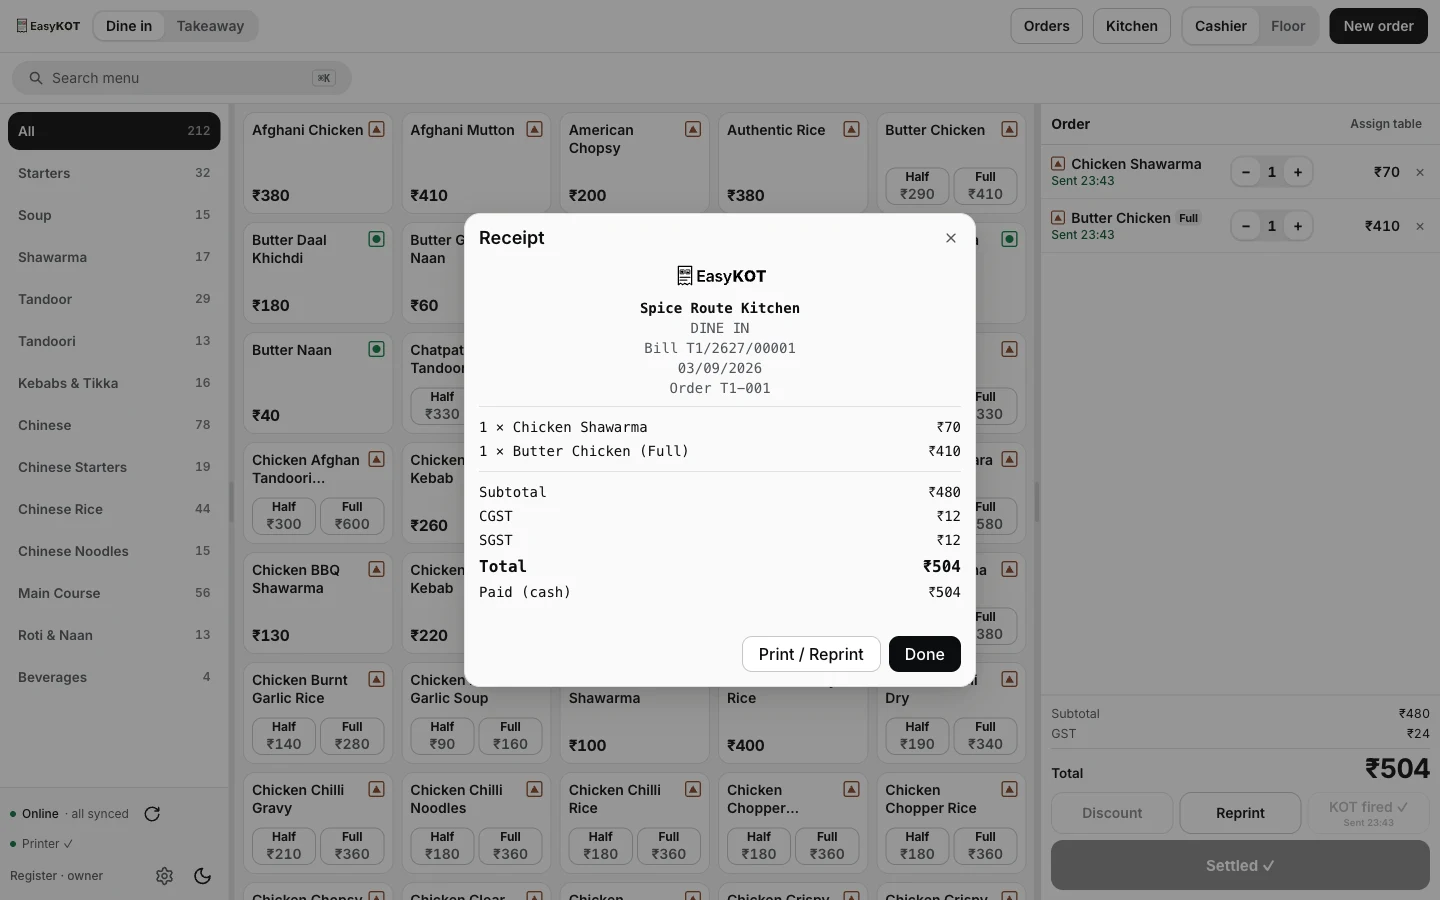
The bill — CGST and SGST split in half, the invoice number, the total.
Watch it land in your dashboard
Back in the owner dashboard, the checklist is gone — the store shows as live. Open Reports → Summary and the sale is already there: Net sales ₹480.00 (that's the ₹504 the till took, minus the ₹24 of GST it added), Orders 1, and the same figure repeated as Average order and Net profit, since this was the day's only sale. Everything below it — food cost, labour cost, prime cost — sits against the targets you'll fill in as real trading days come in.
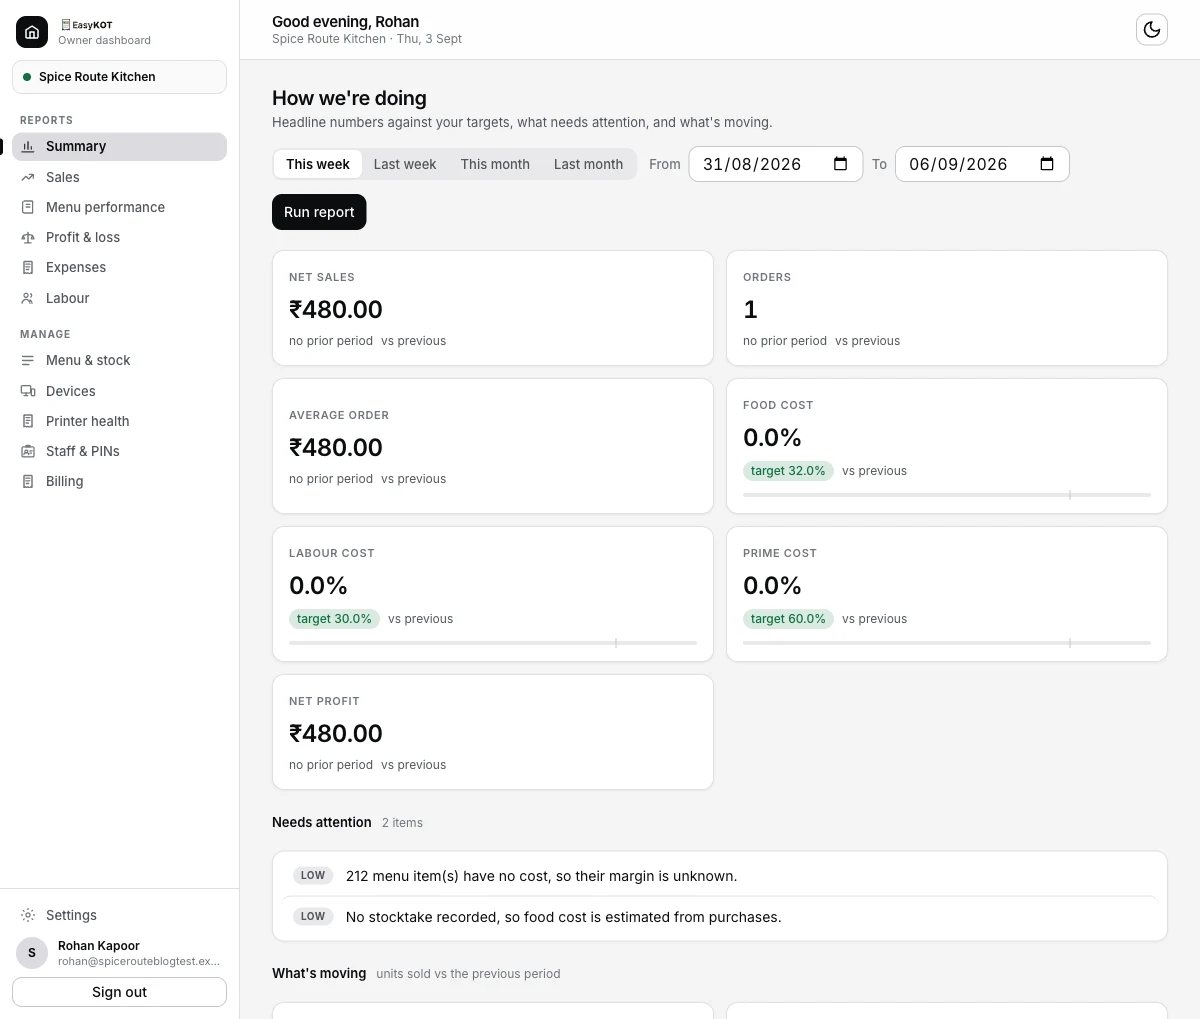
Back in the dashboard — the checklist is gone, and Reports shows the sale.
Why "When you're ready" never blocks you.
- Download the register is separate from Connect your register — you don't need to have downloaded anything yourself, you just need the till running. The step exists to remember to hand out the installer, and it ticks itself the moment any till connects.
- Connect a captain phone needs two codes from two different screens — one from Devices, one the till shows once it's hosting a hub — because the phone talks to the till, not to the dashboard. It has its own guide: setting up the captain app.
- Add your staff is optional because signup already created your own staff row and your own PIN — "your staff" means somebody besides you. Most owners add the team only once the register is actually running; see staff PINs & roles.
Straight answers.
Can I skip the sample menu and add my own dishes instead?
What if I don't have a printer yet?
Does the setup code expire, and what happens if I paste it wrong?
Can more than one register connect to the same store?
What is the owner PIN actually for, day to day?
Do I have to ring a real sale to finish setup, or can I just look around?
Where do I go once the checklist disappears?
After the checklist disappears.
Connect a thermal printer
Wi-Fi, USB or serial — find it, pick 58 mm or 80 mm, and run the test print before service.
Connect the printer →Import your real menu
Swap the sample menu for your own dishes — a photo, a PDF or a spreadsheet, read into a grid you approve.
Import the menu →Owner settings
GST invoice identity, when your trading day ends, and which owner emails actually reach you.
Open owner settings →Want the tax detail behind the first bill — the GST slab, the invoice numbering, the DUPLICATE stamp on a reprint? Your first GST bill covers it, and every other setup and how-to is on the guides hub.
3 mahine chalao, phir paisa lagao.
Three months free, full product, no card. Made in India, for the counter — built inside a running restaurant.